
avg —
Vegetable Draniki with Chicken Mince
Instructions
Prepare the vegetables: peel the potatoes (2 large tubers, about 400 g) and rinse them under cold water. Peel the carrot (1 medium, about 100 g) as well. Remove the skin from the onion (1 medium, about 80 g). The vegetables should be fresh and firm – this is the key to juicy draniki.
Grate the vegetables: grate the potatoes and carrot on a fine grater, or process them in a food processor into fine shavings. Grate the onion on a fine grater too, or chop it very finely with a knife. Fine grating ensures even baking and a uniform texture in the finished draniki.
Place the grated potato on a clean kitchen towel or several layers of muslin and squeeze out the excess liquid. This is a critically important step – too much starchy juice will make the draniki watery and loose, and they will not hold their shape. Squeeze vigorously until no more liquid comes out.
Put the chicken mince (500 g) into a large deep bowl – chicken breast mince is best, as it is the leanest and most tender. Add the squeezed grated potato, carrot and onion. Mix thoroughly by hand or with a spoon, distributing the vegetables evenly through the mince.

In a separate small bowl, lightly beat 1 egg with a fork until smooth. Pour the beaten egg into the mince and vegetables – the egg acts as a binder and stops the draniki from falling apart during baking. Mix until the egg is fully combined with the mixture.
Add 100 g of plain wheat flour – it will absorb the remaining moisture and give the draniki body and cohesion. Season with salt to taste (about ½ tsp), add black pepper (¼ tsp) and your favourite spices – turmeric, paprika or dried herbs. Mix the mixture thoroughly until smooth.
The finished mixture should be thick enough to shape well, but not too dense. If the mixture is a little runny, add another 1–2 tablespoons of flour; if it is too thick, add 1 tablespoon of sour cream. Grease a baking dish (about 25×30 cm) with olive oil using a silicone brush.
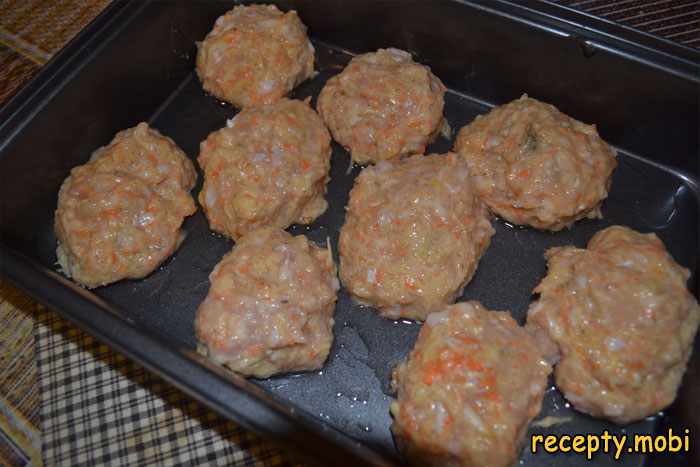
With damp hands, shape the mixture into round patty-style draniki about 5–6 cm in diameter and 1.5–2 cm thick. Arrange them in the greased dish, leaving a little space between them (1–2 cm). The quantities given make about 12–14 draniki.
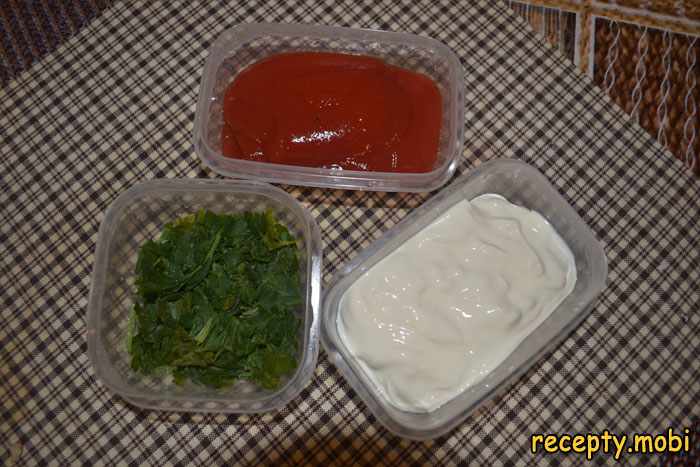
Make the baking sauce: in a separate bowl, mix 3 tablespoons of sour cream (15–20% fat), 3 tablespoons of tomato puree or ketchup and 2–3 tablespoons of warm water. Add finely chopped fresh herbs (dill, parsley) or ½ tsp of dried herbs. Season with salt to taste and mix thoroughly until smooth.
Using a spoon, spread the creamy tomato sauce evenly over each dranik, covering them on top. During baking, the sauce is partly absorbed into the draniki, making them juicy, and partly forms an appetising crust. If you like more sauce, increase the quantities by 1.5 times.
Preheat the oven to 180 °C using the top-and-bottom heat setting. Place the dish with the draniki in the centre of the oven and bake for 25–30 minutes until golden and fully cooked. Check for doneness by piercing one dranik with a toothpick – it should come out clean, with no traces of raw meat.
Take the dish out of the oven and let the draniki rest for 3–5 minutes – during this time the juices redistribute inside and the draniki become juicier. The vegetable draniki with chicken mince are ready! Transfer them to plates, sprinkle with fresh herbs and serve hot. They go wonderfully with rice, buckwheat, bulgur, fresh vegetables or a light salad.


Tips
- 1
Always squeeze the excess liquid out of the grated potato – this is the key to dense, cohesive draniki. A wet potato mixture will make the draniki loose and watery, and they will not hold their shape.
- 2
Instead of chicken mince you can use turkey mince – the taste will be almost identical, but the dish will be even more diet-friendly. Turkey contains even less fat than chicken breast.
- 3
For juicier draniki, add 1 tablespoon of sour cream directly to the mince before shaping. This offsets the dryness of chicken breast and makes the draniki more tender.
- 4
The dish goes well with a fresh vegetable salad of cucumbers and tomatoes, with pickled vegetables or homemade preserves – the slight tang nicely sets off the delicate flavour of the chicken draniki.
FAQ
Can I fry the draniki in a pan instead of baking them? +
Yes, fry the shaped draniki in a pan with a little oil for 3–4 minutes on each side until golden. However, the baked version is significantly healthier – without extra oil and with all the vitamins preserved.
Why do the draniki fall apart during cooking? +
Most likely there are not enough binding ingredients in the mixture – flour or egg. Add another 1–2 tablespoons of flour or one extra egg. Excess moisture in the potato can also be the cause – be sure to squeeze it out before mixing.
Can I freeze the raw draniki? +
Yes, the shaped raw draniki can be frozen for up to 2 months. Lay them out on a tray in a single layer, freeze them, then transfer them to a bag. Bake them straight from frozen, increasing the cooking time by 10–15 minutes.
What can I use instead of tomato puree in the sauce? +
You can use ketchup, diluted tomato paste (1 tablespoon of paste + 2 tablespoons of water), or simply increase the amount of sour cream for a white creamy sauce. The taste will be different, but no less delicious.
- Comment
or post as a guest
Be the first to comment.


")
